
Jan 14, 2011 at 1:14 PM

> So yeah um the guide is in progress again. Somehow I recovered the guide so that's good.
For all you guys just tuning in, here's the game download link:
Jenka's Nightmare Revived FINAL
Way Through G:Spirit Maze
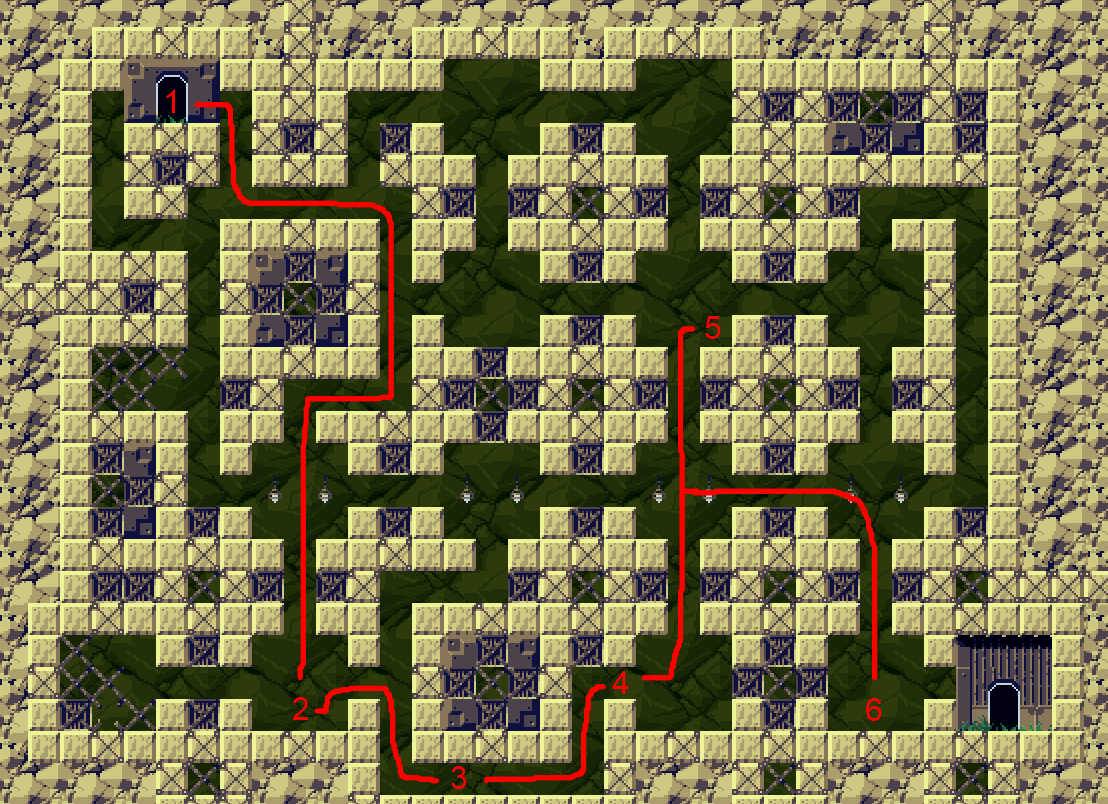
Follow the path from one number to the next exactly. Any unnecessary movements may screw you up.
-Go from 1 to 2.
-Go from 2 to 3.
-Go from 3 to 4.
-Go from 4 to 3. Do not go from 4 to 5.
-Go from 3 to 4.
-Go from 4 to 5. Do not jump when you are at where number 5 is. The fire will find you.
-Go from 5 to 6.
Jenka's Nightmare Revived Official Guide (Version 0.2)
For all you guys just tuning in, here's the game download link:
Jenka's Nightmare Revived FINAL
Way Through G:Spirit Maze
Follow the path from one number to the next exactly. Any unnecessary movements may screw you up.
-Go from 1 to 2.
-Go from 2 to 3.
-Go from 3 to 4.
-Go from 4 to 3. Do not go from 4 to 5.
-Go from 3 to 4.
-Go from 4 to 5. Do not jump when you are at where number 5 is. The fire will find you.
-Go from 5 to 6.
Jenka's Nightmare Revived Official Guide (Version 0.2)
Contents
------------------------------
1. Introduction [AINT]
2. Version history [BVER]
3. Cave Story [CINT]
4. Jenka's Nightmare [DINT]
5. Walkthrough [EWAL]
5a. -Starting Off- [EBEG]
5b. -Deja Vu!- [EMIM]
5c. -On to Grasstown!- [EGRA]
5d. -Taste of Genesis- [EGEN]
5e -Another Taste of Genesis- [ETWO]
5f -The Sandy Enigma- [ESAN]
5g -The Confusing Ordeal- [ELAB]
5h. -WHEEEEEE!- [EWEE]
5i. -More Deja Vu!- [EWUT]
5j. -Oh God it's a Water Level- [EWTR]
5k. -More Water, Why?- [EWR2]
6. Alternate Walkthrough [FWAL]
6j. -Puzzle is Melting my BRAIN- [FPZL]
7. Secrets [GSEC]
7a. Uber Weapons [GWEP]
7b. Locations and Other [GMOR]
8. Boss Guide [BOSS]
9. Upgrade Database [LIFE]
Protip: Use the text in brackets and ctrl+F to quickly navigate.
------------------------------
==============================
1. Introduction [AINT]
------------------------------
I am MagicDoors from the Cave Story Forums <cavestory.org/forums>, and a longtime lover of Cave Story. I decided to finish a legendary mod named Jenka's Nightmare, made by one Shmitz, whom no one has seen for quite a while. And since I don't see any guides for this god-forsaken mod, I'm making one. (Credit to Windsofwinds for her contribution to the guide)
------------------------------
==============================
2. Version history [BVER]
------------------------------
0.1 - Guide started, Overhaul of data added, windsofwinds added to team. More data added, windsofwinds kicked off team.
0.2 - Huzzah for first release.
------------------------------
==============================
3. Cave Story [CINT]
------------------------------
Cave Story is a fantastic game made by Daisuke Amaya, or "Studio Pixel". He created this game completely on his own, with only his friend to give feedback for him. You can download it at <cavestory.org>.
The game is about an amnesiac robot named Quote who finds himself in a land of witches, demons, toasters, and rabbits. He has to stop a human from using the powers of a demonic crown to force the rabbits to do his bidding, and conquer all with his rabbit army.
This game has three different endings, and Jenka's Nightmare takes place after the best ending, so you should play Cave Story before playing Jenka's Nightmare. Unless you want your head to explode from confusion.
------------------------------
==============================
4. Jenka's Nightmare [DINT]
------------------------------
Jenka's Nightmare is originally a mod of Cave Story by Shmitz, but was remade and finished by me, LunarSoul.
The story takes place after Quote and Curly defeat the demon Ballos. They leave the island of Mimiga to try and live a peaceful life, but are zapped back to the island by a mysterious force. After recovering allies, Quote learns that Ballos' sister Jenka is suffering, and has fallen into a deep sleep. In her sleep she is summoning two god-like beings: Oblivion who breaks down what is created, and Genesis who builds with what is destroyed. The sister forces are destroying the island, and Quote needs to find a way to stop them.
------------------------------
==============================
5. Walkthrough
------------------------------
Finally, we arrive at the main focus of the guide. The guide is broken up into different parts. Since there are branching paths, some parts will be skipped, depending on the path you take. The guide will tell you if you need to skip a part or two.
------------------------------
5a. -Starting Off- [EBEG]
(Rooms: A Familiar Cave?, First Cave)
After a mysterious cutscene where three allies are separated, and Quote sees Jenka in pain, you start off in a familiar cave. Because of the effects of Genesis and Oblivion, First Cave has expanded substantially. There are breakable blocks above you, but you need a gun to break them. Move to the lower portion of the room and open the chest you see to get the *Snake*! The Snake in JN has limited ammo, but you may refill it at refill points. Move on and shoot all the critters and energy capsules to level up your gun. (NOTE: In JN HARD, the critters are invincible, so don't bother trying to kill them.) Jump onto the hanging platforms, and nab the life capsule. Afterwards, save your game for safety. Return to the hanging platforms. The next is self explanatory-jump, kill critter, jump, kill bats, jump, kill more bats. Enter the next room. Move to the left, and go down the passage. Be careful not to get hit, and don't waste your Snake ammo. Go left out of the passage, and fall down, being wary of obstacles in the way. Move to the right side of the room, and enter the lion's mouth. Kill the bird, open the chest, and get the *Polar Star*! Now exit, and immediately go up. Ignore the bats, and press against the left wall to find a secret passage to find another life capsule. Just under the passage is a water-filled path back to the top of the room. Go into the first room, and save. You do NOT want to die at this point without saving. Go back to the large room. Optionally get the life capsule on the seemingly unreachable platform by provoking the critter and using it as a platform. Exit the cave through the eastern exit.
------------------------------
5b. -Deja Vu!- [EMIM]
(Mimiga Village, Pipeworks)
As you step out of the cave, you are greeted by a mimiga. But how did he get up here...? Anyway, jump up and grab the chest containing a Snake ammo upgrade, and then fall down. The chest on the left you can't obtain right now, so don't try to. Talk to all the townsfolk inside and outside to learn some info, then climb to the upper-right part of the town (you'll have to do the ninja across some houses), where you'll see a life capsule. This one is tricky to get at this point, but really helpful for a part coming up soon. Grab it if you can, save in the save tower, and go through the "pipeworks" through the door at the bottom of the town (There are two other doors-one to the reservoir and one to the egg corridor-but the latter is blocked off, and they don't lead anywhere right now anyway). Navigate cautiously through he pipeworks unless you've seen it before or you feel adventurous, and pick off the enemies. They are strong, and there aren't any refill points around. At the end of the first map is a hidden chest, which you can get to by falling through some fake blocks and going to the end of the pipe. Be quick, you're drowning. Check the end to get a life pot, then enter through the door above you. Fight off all of the dragonflies attacking you and use the pipes to get to the top. Near the top are a row of pipes, and one of them will lead to a chest with a Snake ammo upgrade. At the top of the room, save, there is a boss battle coming up. Gather ammo and life from the dragonflies if you wish, then enter and use the computer to activate the boss battle. It is a battle against Igor and a bunch of enraged Sues. The Sues keep coming back, no matter how many times you kill them. Just keep shooting Igor little by little, and when you get in a good position, blast the crap out of him. Don't hesitate to use the life pot if you need it, you'll find more. After you beat Igor, you find out that it actually was Sue. Somehow you saved her from her enraged state. You return to the Town Hall and Sue talks about the island. She advises you to check out the reservoir. Go, but not before you save.
------------------------------
5c. -On to Grasstown!- [EGRA]
(Reservoir, Grasstown)
In the reservoir there is a door, and a path under it. Because of the current through the path, you can't get through just yet. So go through the door to arrive in Grasstown. Go into the large building on your right and talk to the folk. Talk to the nurse and sleep in one of the beds to get some lipstick. Save. To the right of the community center is a chest with the missile launcher (or ammo upgrade), but don't take it yet, or you'll lose it and never get it back. Do some platforming and get to the upper-left area of the map. Avoid the spikes and turn on the terminal. After this, platform some more to the right and reach another terminal, and deactivate it. Now you must go into a small room and activate another computer. After this you can travel to the right, killing frogs and activating lots more terminals. Fly across to the upper-right part of the map by riding the fan currents, but be cautious of the jellies, they can knock you off the path easily. At the end, save, and enter the room for a boss battle against Pooh Black. Well, it looks like Pooh Black, but it's actually a compilation of three different boss battles with Balrog. Just try to avoid him, especially when he tries to jump on you, and you should be fine. Once you step out of the room, you will fall to your death. While falling you'll see an unobtainable chest to the left. Don't worry, you'll get that eventually.
(NOTE: It is obtainable at this point, but why get it now? You can't do anything with it yet. Refer to the "Secrets section" if you really want it now.)
------------------------------
5d. -Taste of Genesis- [EGEN]
(Genesis: Sky)
When you touch ground, you lose all of your weapons. That's why you were supposed to leave the ammo upgrade in Grasstown. Now for a bit of platforming! A road will appear before you as you proceed, but this area is more trial and error than skill. The place is linear up until the save point (which you should save at), then becomes a bit trickier. Grab the life capsule by jumping on the moving block and then quickly on to the upper platform. Run into the top hole and wait for the moving block behind you. Jump to the right and then move left, but try to time it so you land on the moving block. After that, just jump on the non-moving blocks, and enter the door.
------------------------------
5e. -Another Taste of Genesis- [ETWO]
(Genesis: Earth)
This area is a bit...odd. There's a chest with a note in it. Don't pay attention to it, it means nothing. Climb to find a terminal. Use it. Rollers will be set free, and the path to a door will be open. Go through the door to get to the Sand Zone.
------------------------------
5f. -The Sandy Enigma- [ESAN]
(Sand Zone, Misery's Abode)
As you start exploring, the way back seals off, so only onward to go. Keep going till you find the first teleporter. You see, you have to feed the puppies treats to switch the destination of the teleporter to get around the place. In this puzzle, you have to set two teleporters to each other(ie. mimiga to gaudi and gaudi to mimiga, but not gaudi to flower) and take the third one. Set mimiga to gaudi(just read the sign, if you got it wrong, go back) and teleport to the upper part of this area. Go right and enter the building you see. Save and heal, then exit and go back left. Set this teleporter to mimiga, then once you are done, continue left. Avoid all enemies and work your way down till you see two skullsteps. From there go right. If you see a death trap, crows, and some flying skulls, you're on the right track. Get across this section to find a chest that contains the *Missile Launcher*! Finally, you can now destroy all in your path! You should have noticed the life capsule under you. To get it, damage yourself so you can get past the deathspike guarding the passage, then re-damage yourself with the spike near the entrance/exit of the passage to get out. Backtrack to the save room and spam level your weapon by saving> resetting> killing> repeating. Level it up, then go back to where the two skullsteps are, drop down and use the teleporter to get to the very top of this place if you set the teleporters right. Get the life capsule behind the teleporter and advance left. Get the missile expansion if you want(refer to the Secrets sections of this guide to explain why you want to leave it) and enter the house on top. Save, grab the *Booster 0.8* (turn it on you derp), and go back to the flower teleporter. Set Flower to Mimiga and use the gaudi teleporter to go to the next part of this place. Journey to a building and save outside, then enter. You will start a cutscence where Misery pops up to promptly eliminate you. Time to trash her! ...Sadly Professor Booster wrecks the party and lectures Misery about acting her age. After that is done, Misery will help you by clearing those blocks that block the non-teleporting way to the mimiga teleporter. Talk to her to get a life pot if you don't have one, then talk to Booster to get the *Fireball*! If you don't talk to him now, you can get it from him where you got the Booster 0.8. Exit, backtrack to gaudi while picking up the optional missile expansion while you fall down to get back to gaudi, and proceed to set flower to gaudi. Go to mimiga, only to get blocked partway through. Go right and fight the Deconstructor. This boss is a pain with all the babies around, but bear through and you'll win. After that, continue to mimiga and use it to find the entrance to the Labyrinth.
------------------------------
5g. - A Confusing Ordeal- [ELAB]
(Labyrinth rooms)
This part of the game is really, REALLY fun. (That was sarcasm, this part is terrible and saddening and will make you cry.) Start off by saving, if you value your sanity. Optionally talk to the Monster X kitty on the top path. Obviously you can't maneuver farther right, so go back and pass the moving blocks. Don't mess with those, you'll quite literally become stuck between a rock and a hard place, which isn't all that pleasant. Go to the next room, and go left into the next room. Go into the door closest to the Blade Gaudi, and look for a secret passage. This leads to the *Map System*, which is useless here. Also in this room is the Labyrinth Shop, which you really should go to, to talk to Sue and Curly, and to get an *Address Chip* from the teleporter. That'll let you warp back to here from Mimiga Village. From here, experiment with the different doors (you might have to go through the same doors a couple of times), until you see a red ribbon thing in the smaller room. There will also be a cthulhu there to warn you about unimportant stuff. In one of the rooms is MALCO, who will trade the *Remote Control* for your *Map System*. Do it, the remote gives you an upgrade and a potential weapon. Dr. Gero is also here and will trade your *Red Lipstick* for one permanent Machine Gun ammo, but only when you have the Machine Gun. You can do this as many times as you want, which gives the Machine Gun pseudo-uber powers. Exit and enter a different door. If you enter the correct door, you will appear in an unfamiliar room. This room is filled with moving blocks that want to crush you. Get through by swiftly running past the blocks and shooting breakable blocks and hiding from evil moving blocks. After you pass them, you arrive to the main event: the Great White Critter, or Balfrog for short. Beat him, and you receive *Critter Juice*. Go back to the Monster X kitty, and give him the juice. Then run to the right and prepare for MONSTER X!
------------------------------
5h. -WHEEEEEE!- [WEEE]
(Labyrinth room, Revolutionarium, First Cave)
This is more of a trial and error part, but there are two main things to be aware of: DON'T unnecessarily use your Booster, and STAY BALANCED. If you start to lose focus you will screw up and die. Now ride on Monster X until you see a small area above you with a Blade Gaudi. Over him is a life capsule, so nab it while you're going by.
Once you reach the end, run to the right and save. You will be in the Revolutionarium. Go right and you will see a small mob that will attack you. Blow them away and continue. Now go down and to the left. Kill everything you see, or you might have trouble later. Fall down the water area and get out as fast as you can, drowning is not pleasant. Heal and save, then go to the right. Take the fuel cell from the chest, and four gaudi brothers attack you in a 4-on-1 boss battle. Beat them and go to the right. You'll arrive at the First Cave! The hermit is awake now, and if you talk to him, you can find out that he'll make you a weapon if you gather four materials, but he doesn't tell you what. For now exit First Cave through the door on the right side, into Mimiga Village.
------------------------------
5i. -More Deja Vu!- [EWUT]
(Mimiga Village, Reservoir)
This looks familiar. Booster under the platform you're standing on to get to a missile expansion, but don't open it yet. Don't open ANY missile expansions while you have the missile launcher. You'll see why later. Go to the Town Hall and converse with Curly and Sue. Curly gives you her *Air Tank*, so now you can go to the Waterway. A different route would be to go to the Egg Corridor first, but that results in backtracking which is boring.
There is one thing you have to do first before you can progress. GO TO THE SAND ZONE AND GET THE BOOSTER 2.FREAKING.0. I'm not even kidding. (Most people forget about this.) Prof Booster gives it to you when you have the *Fuel Cell*.
Now. Go to the Reservoir and take the low path to get to the Waterway door.
(NOTE: There is an important alternate path you must go through to obtain the best ending. Read section 6j for the alternate walkthrough.)
------------------------------
5j. -Oh God it's a Water Level- [EWTR]
(Waterway, G: Water A, G: Water B)
When arriving in the Waterway, follow the current. Save and then activate the terminal. Navigate the area to find two other terminals, which you need to activate. The terminals will NOT stay active when you reset the game, so don't bother saving after activating them. Go right from the save point to get past three (previously closed) gates and get to the exit.
------------------------------
5k. -More Water, Why?- [EWR2]
Arrive in Genesis: Water. Avoid the spikes and propel yourself over the insta-spikes at the top to get across.
==============================
6. Alternate Walkthrough [FWAL]
This section shows any alternate paths you can take, and why you would/should take them.
------------------------------
6j. -Puzzle is Melting my BRAIN- [FPZL]
Once you get the Booster 2.0 and Air Tank, go to the Graveyard. Get through and enter Genesis: Spirit. Kill all the Giant Pignons to make a door appear in the upper-right. Go through and save.
Now comes a fun puzzle. You have to outrun a fire, and if you are in the line of sight of the fire, you lose and have to start the puzzle over. The fire moves towards you as best it can every time you enter a new "square". The line of sight is indicated by a certain tile. The line of sight does not pierce walls. Get to the right side of the map and you're home-free.
After the puzzle you must fight Undead Toroko. She's the same as Enraged Toroko, basically. After this go through and you end up in Genesis: Earth again. Talk to Balrog to help him out of the sand and create an exit. If you have the *Remote Control* you can also platform to the top of the map and enter the small room to find a life capsule. Exit the area and refer to section 5k of this guide.
------------------------------
==============================
7. Secrets [GSEC]
This part of the guide is for finding all the secrets. I must warn you now that there'll be spoilers, so I'd advise for you to play the game before reading this part. Also this is just a reference, you should at least attempt to find the secrets yourself. With all those warnings out of the way, happy hunting for all the secrets now!
------------------------------
7a. UberWeapons [GWEP]
------------------------------
Sky Blade: This a must, for you'll need this to get the good ending. To get it, go to the Outer Wall. Climb or Teleport up to the top and go below the teleporter. Use the booster or Machine Gun to fly until you find some platforms. Follow them untill you get to Oblivion: Moon. Go to the statue and say yes to its question to get the Sky Blade.
The Detonator: This bad boy is second on the list. First turn off the terminal that connects to the ledge fans ( the ones that blow you away when you try to get to Pooh Black ). It is on the 4th or 5th fan-case step, and you should had spotted it at least once. To get to it, turn off the terminal that corresponds to the next set of fans that blows up the next part of the fan-case, then fly up to it to get to it. Next turn off the Western Fans terminal - the first one you turn on. After you've done all that, beat Pooh Black and exit the room to fall down to Genesis: Sky . While falling , you can land in a small alcove that contains a chest if you did all the steps right. In it contains the *Bomb*. An alternate route is to use the level 3 machine gun to nab the *Bomb*. You have to wait a while to do the next step. After getting out of the Labyrinth, you can take the bomb AND your missile launcher to the hermit gunsmith to get the Detonator. I advise you, though, to get the Sky Blade first, because you'll get a one-shot missile launcher to break the blocks that cover the exit out of First Cave otherwise. Why don't you want that? Because that thing will take up space, missile ammo, AND missile expansions (it takes those expansions too, so you might want to hold out getting them so you have more detonator ammo). Now, if you didn't pick up some of the ammo upgrades, you can go on an expansion hunt!
(Note: You can take the Controller you find in the chimney to get a 30 missile expansion, but if you do you'll lock all of the missile expansion chests, so collect all of them before doing that.)
UberBubbler: The easiest to get. After visting Oblivion: Erosion the first time and the event where your friends are kidnapped plays out(Don't go to Oblivion again just yet), find Kanpachi. He is down where the chinfish are at in Mimiga Village. Take to him and say yes to trade your Detonator to get the UberBubbler.
History: The UberBubbler is a glitch with the normal Bubbler that causes it to deal 6 damage instead of 3 on level three and become piercing. Needless to say, Lunar removed it from Genesis: Earth to later involve it in the trading sequence to get it. That's why when you open the chest in Earth, you get the message ' I took your bubbler, and its so POWERFUL', which is an insider joke. And you're inside now!
-Detonator vs UberBubbler-
The Detonator is a super-powered close range version of the Super Missiles. It does damage depending on how close you are to an enemy, and the type of enemy (in theory. Prove me wrong. I DARE YOU.) The UberBubbler is a super-powered version of the Bubbler. The Detonator is great for daredevils or "hardcore" players who like to deal high damage and charge headfirst into enemies. The UberBubbler is good if you want to play it safe but still want to use an uberWeapon (and who doesn't?). You can only have one, so it's your decision.
Polaris: Oh my. To get it you need to hunt for the 4 parts that are scattered through out the game. Then you take the piece to the hermit gunsmith to get the Polaris.
I'm going to break this up into four parts , so follow along with me in this order (you don't have to do it in this order, it's just easy and simpler)
First Piece: In the Outer Wall. Go to the entrance of Oblivion: Moon and from there, jump all the way down till you see a large platform with a chest. It contains the First Piece of the puzzle. (A statue hints at this, showing the map coordinates of the chest.)
Second Piece: At the top of the Chimney(the entrance is in the Yamashita Farm), in the chest that is by the door leading to Oblivion: Erosion (Hint: Don't go through it). You will need Booster 2.0 to get up there. This is the hardest to get, with all the death traps, spikes, butes etc. in your way. Good luck not a dying a few times =P.
Third Piece: In the Egg Corridor, below the entrance to The Outer Wall, is a chest that contains the *ID Card*. Have fun with the Basil. Back track to the Labyrinth and go to the room before Chabo's shop. Use it at the terminal - save, for you will die a lot - and go through the door and drop to the very bottom to find a chest that contains the Third Piece of the puzzle.
Fourth Piece: EASY! In Oblivion: Erosion, find the door that lead to Genesis: Sky and go through it. Save, then use your Machine Gun or your Booster 2.0 to go right and land on the ledge. On it you will find a chest that contains the Fourt Piece.
Now go to Tensuzo (hermit gunsmith) to recieve the Polaris, which is AWESOME!
???: In the Developer's Hideout, talk to magic9mushroom to find out there is one more secret in the game to find. Talk to her once you find it to play a little game.
------------------------------
7b. Locations and Other [GMOR]
------------------------------
Oblivion Acient: A door leads to it in Oblivion: Erosion.
Developer's Hideout: You go there automatically when you get the best ending.
Ikachan Lab: It is in the lower-left coner of Oblivion: Erosion. The door is invisible.
Mimiga Charm : There is a secret passage in Misery's Abode. Use your Map System (if you still have it) to find it and go through it to get it. It makes you look like Curly and unlocks fun dialogue.
Beast Fang : (NOTE: Not found here in JN HARD. See boss guide for more info.)
To the right of the room before Possessed Curly battle there is a Maze. Use your Machine Gun to get to it. Save, then go through the maze. If you get stuck or lost, just push the down button to start the maze again (and again and again). When you find the end of the maze, a chest pops up, in it is the Beast Fang. It is used in the Developer's Room to access New Game + (New Game ++ in JN HARD).
magic9mushroom medal: After the room in the Egg Corridor that has the Zombie Dragons, go through the passage above and go all the way left to find a space that has the magic9mushroom medal.
==============================
8. Boss Strategy Guide [BOSS]
------------------------------
This is a guide on how to beat the bosses of the game. In it are opinions and strategies on how to beat each one.
This also includes a 5 star difficulty rating for each boss and a 1 out of 10 rating for each strategy.
First Boss: Sue-gor (Sugar)
Difficulty:**
This is a multi battle with Sugar and three zombie (undead core) Sues. Also, consider which target you should go after first, Sugar or the sues. The sues respawn after a few seconds.
Strategies
Divide and Conquer
Rating: 7/10
Focus on each sue individually first. Take them down using your Polar Star while hopping around above untill they'reoffscreen. Then use your Snake on Sugar while on the platforms to safely kill it. IF you run out of ammo while fighting, perform aerial attacks with your Polar Star and/or trick her then back attack her while she is shooting at thin air.
Blitzkerg
Rating: 7/10
Unload your Snake at the sues until they're all gone. Then use what remaining ammo on her to hurt her, then spam her with the Polar Star. Use the platforms and the bump on the bottom as reststops and cover from her firepower.
Close Combat
Rating: 4/10
Ignore the sues and focus your efforts on Sugar. It is ill advised since you'll be dodging four targets on screen while trying to stay alive. Only for a challenge for skilled players.
Risk Speedrunner
Rating: 5/10
Ignore the sues and focus your efforts on Sugar. BUT don't try to dodge anything. Start with your Snaaaaaake and spam snake shots until you're empty, then spam polar star shots. This is very risky but great for speedruns. Just be careful of gun level downs.
------------------------------
Second Boss: Pooh Black
Difficulty:**
This is a sequence battle, meaning you have to fight him three times in a row. I'll explain each battle in detail.
1st Battle:
He bum rushes you, and sometimes he jumps to catch you off guard.
2nd Battle:
He starts shooting at you and tries to smash you now.
3rd Battle:
He flies around to both smash you and position himself to spam you with his faster shoot attack. Later he slams into you instead of flying when you damage him enough.
Strategies
Polar-Snake Assault
Rating: 6/10
Use your Snake and your Polar Star in conjunction with each other to deal good damage. First two rounds you should use
a 3-5 shot pattern- three snake shots to 5 Polar Star shots. On the third round, use a 5-5 shot pattern untill he is dead.
Mixed Bag
Rating: 8/10
Use your Polar Star all through the first round, the Snake all through the second round, and use a combo on the third. Suprisingly good if you don't get hit much and conserve your ammo.
Cautious Gunning
Rating: 9/10
Great if you have time. Be careful of Pooh, and assess his movements on your first time battling him. Whittle down his health and don't get hit, especially when he pounces on you.
------------------------------
Third Boss: Deconstructor
Difficulty:***
Its only attack is to spam you with unbreakable missiles. While this may seem easy, keep in mind of the babies swarming you
throughout the fight, which are major pests in this closed space.
Strategies
Kill the Babies!
Rating: 9/10
Unload your missiles on the babies until their numbers are greatly diminished. Then use the remaining missiles on the boss and switch to the Fireball when you run out.
Fireball Volley
Rating: 7/10
Lure the boss to low ground and use your fireball on it to roast it. I suggest the little bluff under the platform, as it is shielded from babies pretty well. Use missiles as necessary.
Missiles Away
Rating: 3/10
Use your missiles on the boss to dissolve its lifebar. While it may seem like a good idea, the babies will eventually overtake you, with you having no good way of getting rid of them. So be careful with this strategy.
------------------------------
Fourth Boss: Great White Critter
Difficulty: ***
It's just Balfrog with a tileset edit.
Strategies
Sneak Attack
Rating: 10/10
There really only is one strategy to beat Great White Critter (or Balfrog for that matter) - get over him as quickly as possible, and load him full of missiles. Repeat this until you run out, then spam your fireballs. Not the hardest boss.
------------------------------
Bonus Boss: Monster X
Difficulty: *****
He's the same as before, but you must fight/ride him to the other end of the Labyrinth. In JN HARD, you can receive the Beast Fang by beating him, but good luck with all the spikes and enemies around him.
Strategies
KILL HIM.
0/10
Kill him until he lies on the ground crying. Dodge everything and SAVE. You get a *Beast Fang* from this in JN HARD.
------------------------------
Fifth Boss(es): Gaudskateers
Difficulty: ****
This is like four identical boss battles at once. With so much stuff going on, it's hard to tell what's happening. Once one is gone, though, the rest quickly follow. Do NOT try to dodge all of their attacks, it is fairly impossible because of their quantity.
Strategies
Assassin
Rating: 6/10
Focus all your missiles on one of the four, and try to kill him as fast as possible. If you have any remaining ammo after that, use on the second, then use the fireball to finish him off. After two are gone, the fight is probably yours, as long as you have some HP left.
Pick them off with the fireball, and avoid their attacks. This strategy is good AND ONLY GOOD if you can focus your attacks on one enemy at a time. It won't work for cautious players - you'll get blown to bits.
Rampage
Rating: 4/10
Attack rapidly and with everything you've got. Be trigger-happy and destroy all four of them as quickly as you can. Not the best planning, if done wrong you might be annihilated. Remember, you have limited space and no health/ammo pickups.
------------------------------
Sixth Boss: Undead Toroko
Difficulty: ***
Only encountered when going through Genesis: Spirit. She is mad that you let her die, and wants revenge. She's exactly the same as Enraged Toroko, but there are blocks overhead with spikes that can seriously damage you. A normal Enraged Toroko strategy should suffice.
Strategies
------------------------------
Seventh Boss: Alpha
Difficulty: **
Same as Omega, but a different color. Remember to get needed pickups from the balls it spits out.
Strategies
Play it Safe
Rating: 7/10
Shoot at Alpha, but only when you can do so without getting hit. Pick him off with a few shots each time. It takes a little longer, but you can come out unscathed, which really doesn't matter since you are transported to a save room right afterwards.
Balanced
Rating: 9/10
A mix of offensive and defensive. If you are going to take significant damage, get into a safe position, no matter how clear of a shot you have, but if you can sustain the damage, bear through it and keep damaging the beast.
Annihilate
Rating: 6/10
Attack without hesitation, no matter the situation. If you can kill Alpha quickly, you won't even have to worry about his jumping phase, and you'll be fine. It is risky though, so don't try it unless you're familiar with Alpha's workings.
------------------------------
Eighth Boss: Genesis Illusion
Difficulty: ****
Ohyes, Illusion. This one is a toughie. He flies around like Ironhead while you try and steady yourself on a screwed up spike-filled battleground. His little friends help knock you around as well. But you can take a one-eyed oval.
Strategies
------------------------------
==============================
9. Upgrade Database [LIFE]
------------------------------
==============================
------------------------------
1. Introduction [AINT]
2. Version history [BVER]
3. Cave Story [CINT]
4. Jenka's Nightmare [DINT]
5. Walkthrough [EWAL]
5a. -Starting Off- [EBEG]
5b. -Deja Vu!- [EMIM]
5c. -On to Grasstown!- [EGRA]
5d. -Taste of Genesis- [EGEN]
5e -Another Taste of Genesis- [ETWO]
5f -The Sandy Enigma- [ESAN]
5g -The Confusing Ordeal- [ELAB]
5h. -WHEEEEEE!- [EWEE]
5i. -More Deja Vu!- [EWUT]
5j. -Oh God it's a Water Level- [EWTR]
5k. -More Water, Why?- [EWR2]
6. Alternate Walkthrough [FWAL]
6j. -Puzzle is Melting my BRAIN- [FPZL]
7. Secrets [GSEC]
7a. Uber Weapons [GWEP]
7b. Locations and Other [GMOR]
8. Boss Guide [BOSS]
9. Upgrade Database [LIFE]
Protip: Use the text in brackets and ctrl+F to quickly navigate.
------------------------------
==============================
1. Introduction [AINT]
------------------------------
I am MagicDoors from the Cave Story Forums <cavestory.org/forums>, and a longtime lover of Cave Story. I decided to finish a legendary mod named Jenka's Nightmare, made by one Shmitz, whom no one has seen for quite a while. And since I don't see any guides for this god-forsaken mod, I'm making one. (Credit to Windsofwinds for her contribution to the guide)
------------------------------
==============================
2. Version history [BVER]
------------------------------
0.1 - Guide started, Overhaul of data added, windsofwinds added to team. More data added, windsofwinds kicked off team.
0.2 - Huzzah for first release.
------------------------------
==============================
3. Cave Story [CINT]
------------------------------
Cave Story is a fantastic game made by Daisuke Amaya, or "Studio Pixel". He created this game completely on his own, with only his friend to give feedback for him. You can download it at <cavestory.org>.
The game is about an amnesiac robot named Quote who finds himself in a land of witches, demons, toasters, and rabbits. He has to stop a human from using the powers of a demonic crown to force the rabbits to do his bidding, and conquer all with his rabbit army.
This game has three different endings, and Jenka's Nightmare takes place after the best ending, so you should play Cave Story before playing Jenka's Nightmare. Unless you want your head to explode from confusion.
------------------------------
==============================
4. Jenka's Nightmare [DINT]
------------------------------
Jenka's Nightmare is originally a mod of Cave Story by Shmitz, but was remade and finished by me, LunarSoul.
The story takes place after Quote and Curly defeat the demon Ballos. They leave the island of Mimiga to try and live a peaceful life, but are zapped back to the island by a mysterious force. After recovering allies, Quote learns that Ballos' sister Jenka is suffering, and has fallen into a deep sleep. In her sleep she is summoning two god-like beings: Oblivion who breaks down what is created, and Genesis who builds with what is destroyed. The sister forces are destroying the island, and Quote needs to find a way to stop them.
------------------------------
==============================
5. Walkthrough
------------------------------
Finally, we arrive at the main focus of the guide. The guide is broken up into different parts. Since there are branching paths, some parts will be skipped, depending on the path you take. The guide will tell you if you need to skip a part or two.
------------------------------
5a. -Starting Off- [EBEG]
(Rooms: A Familiar Cave?, First Cave)
After a mysterious cutscene where three allies are separated, and Quote sees Jenka in pain, you start off in a familiar cave. Because of the effects of Genesis and Oblivion, First Cave has expanded substantially. There are breakable blocks above you, but you need a gun to break them. Move to the lower portion of the room and open the chest you see to get the *Snake*! The Snake in JN has limited ammo, but you may refill it at refill points. Move on and shoot all the critters and energy capsules to level up your gun. (NOTE: In JN HARD, the critters are invincible, so don't bother trying to kill them.) Jump onto the hanging platforms, and nab the life capsule. Afterwards, save your game for safety. Return to the hanging platforms. The next is self explanatory-jump, kill critter, jump, kill bats, jump, kill more bats. Enter the next room. Move to the left, and go down the passage. Be careful not to get hit, and don't waste your Snake ammo. Go left out of the passage, and fall down, being wary of obstacles in the way. Move to the right side of the room, and enter the lion's mouth. Kill the bird, open the chest, and get the *Polar Star*! Now exit, and immediately go up. Ignore the bats, and press against the left wall to find a secret passage to find another life capsule. Just under the passage is a water-filled path back to the top of the room. Go into the first room, and save. You do NOT want to die at this point without saving. Go back to the large room. Optionally get the life capsule on the seemingly unreachable platform by provoking the critter and using it as a platform. Exit the cave through the eastern exit.
------------------------------
5b. -Deja Vu!- [EMIM]
(Mimiga Village, Pipeworks)
As you step out of the cave, you are greeted by a mimiga. But how did he get up here...? Anyway, jump up and grab the chest containing a Snake ammo upgrade, and then fall down. The chest on the left you can't obtain right now, so don't try to. Talk to all the townsfolk inside and outside to learn some info, then climb to the upper-right part of the town (you'll have to do the ninja across some houses), where you'll see a life capsule. This one is tricky to get at this point, but really helpful for a part coming up soon. Grab it if you can, save in the save tower, and go through the "pipeworks" through the door at the bottom of the town (There are two other doors-one to the reservoir and one to the egg corridor-but the latter is blocked off, and they don't lead anywhere right now anyway). Navigate cautiously through he pipeworks unless you've seen it before or you feel adventurous, and pick off the enemies. They are strong, and there aren't any refill points around. At the end of the first map is a hidden chest, which you can get to by falling through some fake blocks and going to the end of the pipe. Be quick, you're drowning. Check the end to get a life pot, then enter through the door above you. Fight off all of the dragonflies attacking you and use the pipes to get to the top. Near the top are a row of pipes, and one of them will lead to a chest with a Snake ammo upgrade. At the top of the room, save, there is a boss battle coming up. Gather ammo and life from the dragonflies if you wish, then enter and use the computer to activate the boss battle. It is a battle against Igor and a bunch of enraged Sues. The Sues keep coming back, no matter how many times you kill them. Just keep shooting Igor little by little, and when you get in a good position, blast the crap out of him. Don't hesitate to use the life pot if you need it, you'll find more. After you beat Igor, you find out that it actually was Sue. Somehow you saved her from her enraged state. You return to the Town Hall and Sue talks about the island. She advises you to check out the reservoir. Go, but not before you save.
------------------------------
5c. -On to Grasstown!- [EGRA]
(Reservoir, Grasstown)
In the reservoir there is a door, and a path under it. Because of the current through the path, you can't get through just yet. So go through the door to arrive in Grasstown. Go into the large building on your right and talk to the folk. Talk to the nurse and sleep in one of the beds to get some lipstick. Save. To the right of the community center is a chest with the missile launcher (or ammo upgrade), but don't take it yet, or you'll lose it and never get it back. Do some platforming and get to the upper-left area of the map. Avoid the spikes and turn on the terminal. After this, platform some more to the right and reach another terminal, and deactivate it. Now you must go into a small room and activate another computer. After this you can travel to the right, killing frogs and activating lots more terminals. Fly across to the upper-right part of the map by riding the fan currents, but be cautious of the jellies, they can knock you off the path easily. At the end, save, and enter the room for a boss battle against Pooh Black. Well, it looks like Pooh Black, but it's actually a compilation of three different boss battles with Balrog. Just try to avoid him, especially when he tries to jump on you, and you should be fine. Once you step out of the room, you will fall to your death. While falling you'll see an unobtainable chest to the left. Don't worry, you'll get that eventually.
(NOTE: It is obtainable at this point, but why get it now? You can't do anything with it yet. Refer to the "Secrets section" if you really want it now.)
------------------------------
5d. -Taste of Genesis- [EGEN]
(Genesis: Sky)
When you touch ground, you lose all of your weapons. That's why you were supposed to leave the ammo upgrade in Grasstown. Now for a bit of platforming! A road will appear before you as you proceed, but this area is more trial and error than skill. The place is linear up until the save point (which you should save at), then becomes a bit trickier. Grab the life capsule by jumping on the moving block and then quickly on to the upper platform. Run into the top hole and wait for the moving block behind you. Jump to the right and then move left, but try to time it so you land on the moving block. After that, just jump on the non-moving blocks, and enter the door.
------------------------------
5e. -Another Taste of Genesis- [ETWO]
(Genesis: Earth)
This area is a bit...odd. There's a chest with a note in it. Don't pay attention to it, it means nothing. Climb to find a terminal. Use it. Rollers will be set free, and the path to a door will be open. Go through the door to get to the Sand Zone.
------------------------------
5f. -The Sandy Enigma- [ESAN]
(Sand Zone, Misery's Abode)
As you start exploring, the way back seals off, so only onward to go. Keep going till you find the first teleporter. You see, you have to feed the puppies treats to switch the destination of the teleporter to get around the place. In this puzzle, you have to set two teleporters to each other(ie. mimiga to gaudi and gaudi to mimiga, but not gaudi to flower) and take the third one. Set mimiga to gaudi(just read the sign, if you got it wrong, go back) and teleport to the upper part of this area. Go right and enter the building you see. Save and heal, then exit and go back left. Set this teleporter to mimiga, then once you are done, continue left. Avoid all enemies and work your way down till you see two skullsteps. From there go right. If you see a death trap, crows, and some flying skulls, you're on the right track. Get across this section to find a chest that contains the *Missile Launcher*! Finally, you can now destroy all in your path! You should have noticed the life capsule under you. To get it, damage yourself so you can get past the deathspike guarding the passage, then re-damage yourself with the spike near the entrance/exit of the passage to get out. Backtrack to the save room and spam level your weapon by saving> resetting> killing> repeating. Level it up, then go back to where the two skullsteps are, drop down and use the teleporter to get to the very top of this place if you set the teleporters right. Get the life capsule behind the teleporter and advance left. Get the missile expansion if you want(refer to the Secrets sections of this guide to explain why you want to leave it) and enter the house on top. Save, grab the *Booster 0.8* (turn it on you derp), and go back to the flower teleporter. Set Flower to Mimiga and use the gaudi teleporter to go to the next part of this place. Journey to a building and save outside, then enter. You will start a cutscence where Misery pops up to promptly eliminate you. Time to trash her! ...Sadly Professor Booster wrecks the party and lectures Misery about acting her age. After that is done, Misery will help you by clearing those blocks that block the non-teleporting way to the mimiga teleporter. Talk to her to get a life pot if you don't have one, then talk to Booster to get the *Fireball*! If you don't talk to him now, you can get it from him where you got the Booster 0.8. Exit, backtrack to gaudi while picking up the optional missile expansion while you fall down to get back to gaudi, and proceed to set flower to gaudi. Go to mimiga, only to get blocked partway through. Go right and fight the Deconstructor. This boss is a pain with all the babies around, but bear through and you'll win. After that, continue to mimiga and use it to find the entrance to the Labyrinth.
------------------------------
5g. - A Confusing Ordeal- [ELAB]
(Labyrinth rooms)
This part of the game is really, REALLY fun. (That was sarcasm, this part is terrible and saddening and will make you cry.) Start off by saving, if you value your sanity. Optionally talk to the Monster X kitty on the top path. Obviously you can't maneuver farther right, so go back and pass the moving blocks. Don't mess with those, you'll quite literally become stuck between a rock and a hard place, which isn't all that pleasant. Go to the next room, and go left into the next room. Go into the door closest to the Blade Gaudi, and look for a secret passage. This leads to the *Map System*, which is useless here. Also in this room is the Labyrinth Shop, which you really should go to, to talk to Sue and Curly, and to get an *Address Chip* from the teleporter. That'll let you warp back to here from Mimiga Village. From here, experiment with the different doors (you might have to go through the same doors a couple of times), until you see a red ribbon thing in the smaller room. There will also be a cthulhu there to warn you about unimportant stuff. In one of the rooms is MALCO, who will trade the *Remote Control* for your *Map System*. Do it, the remote gives you an upgrade and a potential weapon. Dr. Gero is also here and will trade your *Red Lipstick* for one permanent Machine Gun ammo, but only when you have the Machine Gun. You can do this as many times as you want, which gives the Machine Gun pseudo-uber powers. Exit and enter a different door. If you enter the correct door, you will appear in an unfamiliar room. This room is filled with moving blocks that want to crush you. Get through by swiftly running past the blocks and shooting breakable blocks and hiding from evil moving blocks. After you pass them, you arrive to the main event: the Great White Critter, or Balfrog for short. Beat him, and you receive *Critter Juice*. Go back to the Monster X kitty, and give him the juice. Then run to the right and prepare for MONSTER X!
------------------------------
5h. -WHEEEEEE!- [WEEE]
(Labyrinth room, Revolutionarium, First Cave)
This is more of a trial and error part, but there are two main things to be aware of: DON'T unnecessarily use your Booster, and STAY BALANCED. If you start to lose focus you will screw up and die. Now ride on Monster X until you see a small area above you with a Blade Gaudi. Over him is a life capsule, so nab it while you're going by.
Once you reach the end, run to the right and save. You will be in the Revolutionarium. Go right and you will see a small mob that will attack you. Blow them away and continue. Now go down and to the left. Kill everything you see, or you might have trouble later. Fall down the water area and get out as fast as you can, drowning is not pleasant. Heal and save, then go to the right. Take the fuel cell from the chest, and four gaudi brothers attack you in a 4-on-1 boss battle. Beat them and go to the right. You'll arrive at the First Cave! The hermit is awake now, and if you talk to him, you can find out that he'll make you a weapon if you gather four materials, but he doesn't tell you what. For now exit First Cave through the door on the right side, into Mimiga Village.
------------------------------
5i. -More Deja Vu!- [EWUT]
(Mimiga Village, Reservoir)
This looks familiar. Booster under the platform you're standing on to get to a missile expansion, but don't open it yet. Don't open ANY missile expansions while you have the missile launcher. You'll see why later. Go to the Town Hall and converse with Curly and Sue. Curly gives you her *Air Tank*, so now you can go to the Waterway. A different route would be to go to the Egg Corridor first, but that results in backtracking which is boring.
There is one thing you have to do first before you can progress. GO TO THE SAND ZONE AND GET THE BOOSTER 2.FREAKING.0. I'm not even kidding. (Most people forget about this.) Prof Booster gives it to you when you have the *Fuel Cell*.
Now. Go to the Reservoir and take the low path to get to the Waterway door.
(NOTE: There is an important alternate path you must go through to obtain the best ending. Read section 6j for the alternate walkthrough.)
------------------------------
5j. -Oh God it's a Water Level- [EWTR]
(Waterway, G: Water A, G: Water B)
When arriving in the Waterway, follow the current. Save and then activate the terminal. Navigate the area to find two other terminals, which you need to activate. The terminals will NOT stay active when you reset the game, so don't bother saving after activating them. Go right from the save point to get past three (previously closed) gates and get to the exit.
------------------------------
5k. -More Water, Why?- [EWR2]
Arrive in Genesis: Water. Avoid the spikes and propel yourself over the insta-spikes at the top to get across.
==============================
6. Alternate Walkthrough [FWAL]
This section shows any alternate paths you can take, and why you would/should take them.
------------------------------
6j. -Puzzle is Melting my BRAIN- [FPZL]
Once you get the Booster 2.0 and Air Tank, go to the Graveyard. Get through and enter Genesis: Spirit. Kill all the Giant Pignons to make a door appear in the upper-right. Go through and save.
Now comes a fun puzzle. You have to outrun a fire, and if you are in the line of sight of the fire, you lose and have to start the puzzle over. The fire moves towards you as best it can every time you enter a new "square". The line of sight is indicated by a certain tile. The line of sight does not pierce walls. Get to the right side of the map and you're home-free.
After the puzzle you must fight Undead Toroko. She's the same as Enraged Toroko, basically. After this go through and you end up in Genesis: Earth again. Talk to Balrog to help him out of the sand and create an exit. If you have the *Remote Control* you can also platform to the top of the map and enter the small room to find a life capsule. Exit the area and refer to section 5k of this guide.
------------------------------
==============================
7. Secrets [GSEC]
This part of the guide is for finding all the secrets. I must warn you now that there'll be spoilers, so I'd advise for you to play the game before reading this part. Also this is just a reference, you should at least attempt to find the secrets yourself. With all those warnings out of the way, happy hunting for all the secrets now!
------------------------------
7a. UberWeapons [GWEP]
------------------------------
Sky Blade: This a must, for you'll need this to get the good ending. To get it, go to the Outer Wall. Climb or Teleport up to the top and go below the teleporter. Use the booster or Machine Gun to fly until you find some platforms. Follow them untill you get to Oblivion: Moon. Go to the statue and say yes to its question to get the Sky Blade.
The Detonator: This bad boy is second on the list. First turn off the terminal that connects to the ledge fans ( the ones that blow you away when you try to get to Pooh Black ). It is on the 4th or 5th fan-case step, and you should had spotted it at least once. To get to it, turn off the terminal that corresponds to the next set of fans that blows up the next part of the fan-case, then fly up to it to get to it. Next turn off the Western Fans terminal - the first one you turn on. After you've done all that, beat Pooh Black and exit the room to fall down to Genesis: Sky . While falling , you can land in a small alcove that contains a chest if you did all the steps right. In it contains the *Bomb*. An alternate route is to use the level 3 machine gun to nab the *Bomb*. You have to wait a while to do the next step. After getting out of the Labyrinth, you can take the bomb AND your missile launcher to the hermit gunsmith to get the Detonator. I advise you, though, to get the Sky Blade first, because you'll get a one-shot missile launcher to break the blocks that cover the exit out of First Cave otherwise. Why don't you want that? Because that thing will take up space, missile ammo, AND missile expansions (it takes those expansions too, so you might want to hold out getting them so you have more detonator ammo). Now, if you didn't pick up some of the ammo upgrades, you can go on an expansion hunt!
(Note: You can take the Controller you find in the chimney to get a 30 missile expansion, but if you do you'll lock all of the missile expansion chests, so collect all of them before doing that.)
UberBubbler: The easiest to get. After visting Oblivion: Erosion the first time and the event where your friends are kidnapped plays out(Don't go to Oblivion again just yet), find Kanpachi. He is down where the chinfish are at in Mimiga Village. Take to him and say yes to trade your Detonator to get the UberBubbler.
History: The UberBubbler is a glitch with the normal Bubbler that causes it to deal 6 damage instead of 3 on level three and become piercing. Needless to say, Lunar removed it from Genesis: Earth to later involve it in the trading sequence to get it. That's why when you open the chest in Earth, you get the message ' I took your bubbler, and its so POWERFUL', which is an insider joke. And you're inside now!
-Detonator vs UberBubbler-
The Detonator is a super-powered close range version of the Super Missiles. It does damage depending on how close you are to an enemy, and the type of enemy (in theory. Prove me wrong. I DARE YOU.) The UberBubbler is a super-powered version of the Bubbler. The Detonator is great for daredevils or "hardcore" players who like to deal high damage and charge headfirst into enemies. The UberBubbler is good if you want to play it safe but still want to use an uberWeapon (and who doesn't?). You can only have one, so it's your decision.
Polaris: Oh my. To get it you need to hunt for the 4 parts that are scattered through out the game. Then you take the piece to the hermit gunsmith to get the Polaris.
I'm going to break this up into four parts , so follow along with me in this order (you don't have to do it in this order, it's just easy and simpler)
First Piece: In the Outer Wall. Go to the entrance of Oblivion: Moon and from there, jump all the way down till you see a large platform with a chest. It contains the First Piece of the puzzle. (A statue hints at this, showing the map coordinates of the chest.)
Second Piece: At the top of the Chimney(the entrance is in the Yamashita Farm), in the chest that is by the door leading to Oblivion: Erosion (Hint: Don't go through it). You will need Booster 2.0 to get up there. This is the hardest to get, with all the death traps, spikes, butes etc. in your way. Good luck not a dying a few times =P.
Third Piece: In the Egg Corridor, below the entrance to The Outer Wall, is a chest that contains the *ID Card*. Have fun with the Basil. Back track to the Labyrinth and go to the room before Chabo's shop. Use it at the terminal - save, for you will die a lot - and go through the door and drop to the very bottom to find a chest that contains the Third Piece of the puzzle.
Fourth Piece: EASY! In Oblivion: Erosion, find the door that lead to Genesis: Sky and go through it. Save, then use your Machine Gun or your Booster 2.0 to go right and land on the ledge. On it you will find a chest that contains the Fourt Piece.
Now go to Tensuzo (hermit gunsmith) to recieve the Polaris, which is AWESOME!
???: In the Developer's Hideout, talk to magic9mushroom to find out there is one more secret in the game to find. Talk to her once you find it to play a little game.
------------------------------
7b. Locations and Other [GMOR]
------------------------------
Oblivion Acient: A door leads to it in Oblivion: Erosion.
Developer's Hideout: You go there automatically when you get the best ending.
Ikachan Lab: It is in the lower-left coner of Oblivion: Erosion. The door is invisible.
Mimiga Charm : There is a secret passage in Misery's Abode. Use your Map System (if you still have it) to find it and go through it to get it. It makes you look like Curly and unlocks fun dialogue.
Beast Fang : (NOTE: Not found here in JN HARD. See boss guide for more info.)
To the right of the room before Possessed Curly battle there is a Maze. Use your Machine Gun to get to it. Save, then go through the maze. If you get stuck or lost, just push the down button to start the maze again (and again and again). When you find the end of the maze, a chest pops up, in it is the Beast Fang. It is used in the Developer's Room to access New Game + (New Game ++ in JN HARD).
magic9mushroom medal: After the room in the Egg Corridor that has the Zombie Dragons, go through the passage above and go all the way left to find a space that has the magic9mushroom medal.
==============================
8. Boss Strategy Guide [BOSS]
------------------------------
This is a guide on how to beat the bosses of the game. In it are opinions and strategies on how to beat each one.
This also includes a 5 star difficulty rating for each boss and a 1 out of 10 rating for each strategy.
First Boss: Sue-gor (Sugar)
Difficulty:**
This is a multi battle with Sugar and three zombie (undead core) Sues. Also, consider which target you should go after first, Sugar or the sues. The sues respawn after a few seconds.
Strategies
Divide and Conquer
Rating: 7/10
Focus on each sue individually first. Take them down using your Polar Star while hopping around above untill they'reoffscreen. Then use your Snake on Sugar while on the platforms to safely kill it. IF you run out of ammo while fighting, perform aerial attacks with your Polar Star and/or trick her then back attack her while she is shooting at thin air.
Blitzkerg
Rating: 7/10
Unload your Snake at the sues until they're all gone. Then use what remaining ammo on her to hurt her, then spam her with the Polar Star. Use the platforms and the bump on the bottom as reststops and cover from her firepower.
Close Combat
Rating: 4/10
Ignore the sues and focus your efforts on Sugar. It is ill advised since you'll be dodging four targets on screen while trying to stay alive. Only for a challenge for skilled players.
Risk Speedrunner
Rating: 5/10
Ignore the sues and focus your efforts on Sugar. BUT don't try to dodge anything. Start with your Snaaaaaake and spam snake shots until you're empty, then spam polar star shots. This is very risky but great for speedruns. Just be careful of gun level downs.
------------------------------
Second Boss: Pooh Black
Difficulty:**
This is a sequence battle, meaning you have to fight him three times in a row. I'll explain each battle in detail.
1st Battle:
He bum rushes you, and sometimes he jumps to catch you off guard.
2nd Battle:
He starts shooting at you and tries to smash you now.
3rd Battle:
He flies around to both smash you and position himself to spam you with his faster shoot attack. Later he slams into you instead of flying when you damage him enough.
Strategies
Polar-Snake Assault
Rating: 6/10
Use your Snake and your Polar Star in conjunction with each other to deal good damage. First two rounds you should use
a 3-5 shot pattern- three snake shots to 5 Polar Star shots. On the third round, use a 5-5 shot pattern untill he is dead.
Mixed Bag
Rating: 8/10
Use your Polar Star all through the first round, the Snake all through the second round, and use a combo on the third. Suprisingly good if you don't get hit much and conserve your ammo.
Cautious Gunning
Rating: 9/10
Great if you have time. Be careful of Pooh, and assess his movements on your first time battling him. Whittle down his health and don't get hit, especially when he pounces on you.
------------------------------
Third Boss: Deconstructor
Difficulty:***
Its only attack is to spam you with unbreakable missiles. While this may seem easy, keep in mind of the babies swarming you
throughout the fight, which are major pests in this closed space.
Strategies
Kill the Babies!
Rating: 9/10
Unload your missiles on the babies until their numbers are greatly diminished. Then use the remaining missiles on the boss and switch to the Fireball when you run out.
Fireball Volley
Rating: 7/10
Lure the boss to low ground and use your fireball on it to roast it. I suggest the little bluff under the platform, as it is shielded from babies pretty well. Use missiles as necessary.
Missiles Away
Rating: 3/10
Use your missiles on the boss to dissolve its lifebar. While it may seem like a good idea, the babies will eventually overtake you, with you having no good way of getting rid of them. So be careful with this strategy.
------------------------------
Fourth Boss: Great White Critter
Difficulty: ***
It's just Balfrog with a tileset edit.
Strategies
Sneak Attack
Rating: 10/10
There really only is one strategy to beat Great White Critter (or Balfrog for that matter) - get over him as quickly as possible, and load him full of missiles. Repeat this until you run out, then spam your fireballs. Not the hardest boss.
------------------------------
Bonus Boss: Monster X
Difficulty: *****
He's the same as before, but you must fight/ride him to the other end of the Labyrinth. In JN HARD, you can receive the Beast Fang by beating him, but good luck with all the spikes and enemies around him.
Strategies
KILL HIM.
0/10
Kill him until he lies on the ground crying. Dodge everything and SAVE. You get a *Beast Fang* from this in JN HARD.
------------------------------
Fifth Boss(es): Gaudskateers
Difficulty: ****
This is like four identical boss battles at once. With so much stuff going on, it's hard to tell what's happening. Once one is gone, though, the rest quickly follow. Do NOT try to dodge all of their attacks, it is fairly impossible because of their quantity.
Strategies
Assassin
Rating: 6/10
Focus all your missiles on one of the four, and try to kill him as fast as possible. If you have any remaining ammo after that, use on the second, then use the fireball to finish him off. After two are gone, the fight is probably yours, as long as you have some HP left.
Pick them off with the fireball, and avoid their attacks. This strategy is good AND ONLY GOOD if you can focus your attacks on one enemy at a time. It won't work for cautious players - you'll get blown to bits.
Rampage
Rating: 4/10
Attack rapidly and with everything you've got. Be trigger-happy and destroy all four of them as quickly as you can. Not the best planning, if done wrong you might be annihilated. Remember, you have limited space and no health/ammo pickups.
------------------------------
Sixth Boss: Undead Toroko
Difficulty: ***
Only encountered when going through Genesis: Spirit. She is mad that you let her die, and wants revenge. She's exactly the same as Enraged Toroko, but there are blocks overhead with spikes that can seriously damage you. A normal Enraged Toroko strategy should suffice.
Strategies
------------------------------
Seventh Boss: Alpha
Difficulty: **
Same as Omega, but a different color. Remember to get needed pickups from the balls it spits out.
Strategies
Play it Safe
Rating: 7/10
Shoot at Alpha, but only when you can do so without getting hit. Pick him off with a few shots each time. It takes a little longer, but you can come out unscathed, which really doesn't matter since you are transported to a save room right afterwards.
Balanced
Rating: 9/10
A mix of offensive and defensive. If you are going to take significant damage, get into a safe position, no matter how clear of a shot you have, but if you can sustain the damage, bear through it and keep damaging the beast.
Annihilate
Rating: 6/10
Attack without hesitation, no matter the situation. If you can kill Alpha quickly, you won't even have to worry about his jumping phase, and you'll be fine. It is risky though, so don't try it unless you're familiar with Alpha's workings.
------------------------------
Eighth Boss: Genesis Illusion
Difficulty: ****
Ohyes, Illusion. This one is a toughie. He flies around like Ironhead while you try and steady yourself on a screwed up spike-filled battleground. His little friends help knock you around as well. But you can take a one-eyed oval.
Strategies
------------------------------
==============================
9. Upgrade Database [LIFE]
------------------------------
==============================


